
When I began doing emulsion transfers, there were not many tutorials online and I ended up having to do a lot of experimentation and guess work. There are many different techniques that can be used to achieve an emulsion life, so I thought I would add some of my personal tips and tricks to this tutorial.
Each tutorial has variation in the supplies they say you need and I have found some of them to be unnecessary and have found items in my home that work better or equally well. These are the tools that I personally use for all of my pieces.

Supplies:
any instant film photo
2 developing trays
x-acto knife or scissors
small foam brush (optional)
small flat paintbrush
cold press watercolor paper (or other transfer surface)
hot water
Step One: Prepare Work Area
To begin, you’ll want to make sure you have a clean work surface. To prepare your developing trays, fill one with cold water and one with hot water. The water should be hot to the touch, but not hot enough to burn your skin. If you don’t have a couple of darkroom developing trays lying around your house, any similarly shaped container can be substituted.
Step Two: Prepare Photograph
You’ll now need to separate your photograph from the frame. There are a couple of ways this can be done and I have used both techniques. Either you can use scissors and cut along the lines of the frame, or you can use an x-acto knife to peel the frame off. Using the x-acto knife method, I start by flipping the image face down and running the knife underneath the white edges of the frame, separating it from the backing. I then peel away the rest of the white part from the front of the image. Once you have just the clear part of the frame, make sure to run the knife along the bottom edge of the image otherwise you will have excess emulsion. If you are just beginning, I recommend using scissors because the edges of the image are sealed and can rip if you aren’t extremely careful peeling the emulsion off.
The difference between these methods is similar in my mind to having a rebate edge on a film photograph or cropping it out.


Step Three: Soaking
Once you have your image separated from the frame, you'll want to place it into the hot water and let it soak for 5-10 minutes depending how hot the water is. You’ll know it’s ready when it starts to looks rippled and the edges start to com apart. From here, carefully peel the back off. I then use my foam brush to wipe the remaining chemistry away from the emulsion (the white flaky stuff). You can use your other brush or even your fingers for this step, I have just found that the foam brush is quick and effective while still being gentle and they are around .50 cents at any hardware store.

From here, carefully peel the back off. I then use my foam brush to wipe the remaining chemistry away from the emulsion (the white flaky stuff). You can use your other brush or even your fingers for this step, I have just found that the foam brush is quick and effective while still being gentle and they are around .50 cents at any hardware store.


Step Four: The Transfer
Before you start handling the emulsion, submerge your transfer surface in the cold water bath. For this tutorial I will use cold press watercolor paper, but you can pretty much use anything that can withstand being put in water. You can also use hot press watercolor paper, I just prefer the smoother look of the cold press paper for my purposes.
Once all of the chemistry is wiped from your emulsion, you will carefully peel the gelatin-like emulsion away from the plastic film. I like to do this as carefully as I can so the emulsion doesn't rip (if it does no worries, it could add some extra dimension to your picture). Try to keep the image flat and don't let it crumple too much. Your goal is to handle it as little as possible and uncrumpling a ball of gelatin is definitely going to increase the risk of tearing it.


Once it is separated from the plastic, pick it up keeping it as flat as possible and put it on top of your paper in the cold water bath. This part can be complicated and I suggest finding a method that works best for you. What I try to do is spread the image out again so you have a square, then with your hand try to center it on the paper. I tend to hold the emulsion still with my hand, and lift the paper to meet it and then lift the whole thing out of the water completely. You can definitely try to do all of this under water, but it tends to fold around the edges and look like it’s melting in the direction you take it out of the water. Instead, I take it out of the water without worrying too much if it’s perfect.
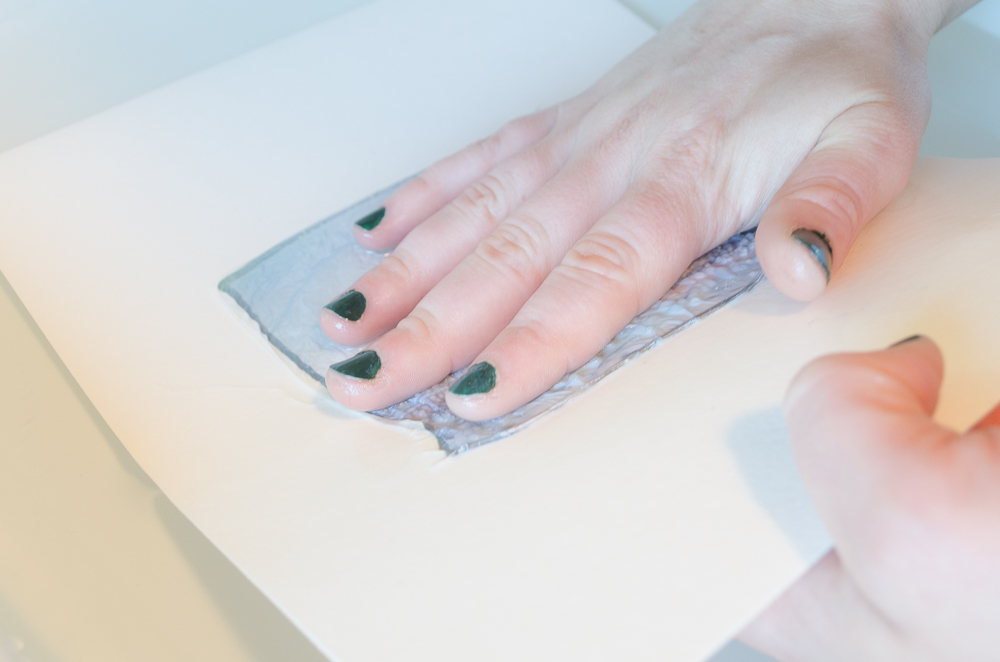
If you are attempting this method make sure to thoroughly wet your paintbrush, too little water will cause it to tear. Wet your brush and the emulsion and carefully push the emulsion where you want it to go.I find this method faster to get a perfectly square and centered image, however it definitely requires more care and a delicate touch. I use my brush as well as my fingers to push out and bubbles of water that may be trapped underneath the emulsion as well. Don’t worry about the tiny bubbles, they will dry and you’ll never know they were there.


Once you are happy with the product you are done! I let mine air dry, but if you are feeling impatient, you can use a hair dryer on a low setting to dry it.
